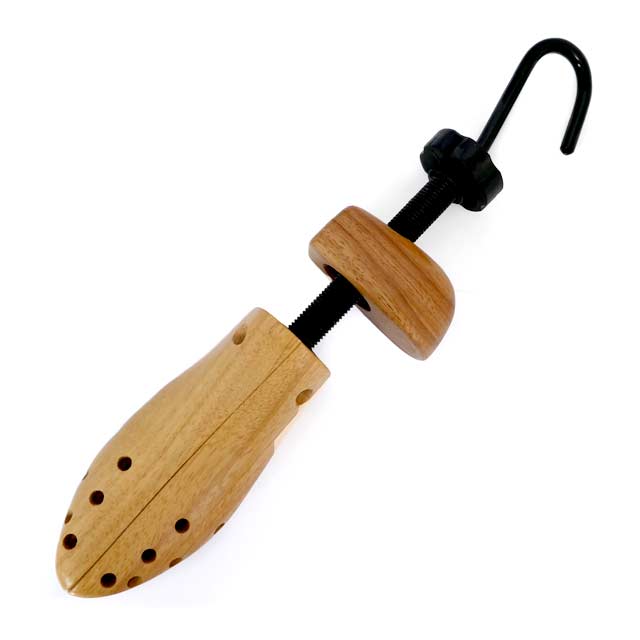
Wooden Two Way Shoe Stretcher
This Sturdy wooden two way shoe stretcher allows you to strech your shoes in width or lenght depending on the shoes and comes with 3 Bunion plugs to pin piont areas for bunions and Hammer toes etc, to ensures an effective result when stretching shoes your shoes and can also double up as a shoe tree.
Available in the following sizes:
MEN’S SIZES : Small 41/42EU, Medium 43/44 EU, Large 45/46 EU
LADIES SIZES :SMALL 36/37, MEDUIM 38/39.5, LARGE 40/ 41
SPECIAL ONLINE OFFER: BUY TWO STRECHERS AND GET 10% OFF PLUS FREE DEILVERY in the ROI AND ONCE USED FOR STRECHING THEY CAN DOUBLE UP AS SHOE TREES
This wooden Shoe stretcher has 12 Holes and 3 plugs that allows you to target areas known to relieve pain associated with blisters, corns or bunions
Use in conjunction with Stretch spray or foam to soften and mellow the leather before inserting in the shoe.
Once stretched we reccomend to use Shoe Trees to help keep their shape when they are not in use.
How to use the Two way Wooden Shoe Stretcher.
This Stretcher can stretch the Width and length (depending on type of the shoes) and spot stretch specific problem areas such as bunions and hammers toes.
Below I will break down the shoe stretching process into 5 steps. It’s not difficult, but you should still read the below carefully, so you don’t make a mistake and damage your shoes.
STEP ONE – PREPARE THE STRETCHER
You need to fully close the shoe stretcher so you can be ready to pop it into your shoe.
To do this, turn the metal loop handle at the back counter clockwise and this will close the toe block.
Once you have the stretcher in the shoe spin the Lengthening Drum clockwise to push the Heel Block up against the Toe Block. If you don’t do this, it will be difficult to fit the Heel Block into your shoe.
And finally, if you need to “target stretch” a specific local area of your shoe, insert Bunion Plug into one of the 12 plug points on the stretcher in a spot that matches the problem area on your shoe.
STEP TWO – PUTTING THE STRETCHER INTO YOU SHOE.
If you have shoe stretch spray you can spray the inside of your shoes first as this will help start softening and mellowing the leather, Then you can insert the toe block into your shoe and push it to the front. You should be able to feel it, and any plugs you attached, through the shoe leather.
Then, while pushing the stretcher up toward the laces, swivel the Heel Block down into your shoe. This might take some wiggling and pushing down on heel material Do your best to get it in without damaging your shoe!
STEP THREE – START TO STRETCH
Turn the lengthening drum counter clockwise to move the heel block all the way to the back of your shoe. Otherwise, no stretching will work properly.
If you are trying to stretch length, then go ahead and turn the Lengthening Drum counter clockwise some more to start to stretch your shoe from front to back. You will see and feel the tightness. Don’t go too tight.
If you are not stretching the length, just leave it snug (but not tight) at the back of the heel.
Now to stretch the width, begin to turn the metal loop Handle clockwise. This will open the Toe Block of the stretcher to stretch the width of your shoe.
Once you feel the toe block through the outside of your shoe and it feels “snug,” give it a one more twist to achieve the optimum stretch. This step will also push any bunion plugs you attached into the side of your shoe.
Be careful not to over-stretch and once it has been stretching for a while you can give an additional twist.
Stretching too hard, too fast, could tear or damage some shoes so be gentel.
STEP FOUR – WAIT AND REMOVE
Leave the stretcher in your shoe for at least 6 to 8 hours. The longer in your shoe, the more the leather fibers can stretch and relax to keep its shape.
Now, remove the stretcher by closing it back up again and wiggling it out. In this order, turn the metal loop Handle counter clockwise to close the toe block, and then spin the lengthening drum clockwise to push up the heel block.
Then wiggle out the heel block first, and pull out the stretcher.
STEP FIVE – TRY ON YOUR NEWLY STRETCHED SHOE
How are they fitting now for you? Are they more comfortable for you now? Or does it need some more time stretching?
If you only did one side shoe (right shoe), now you can move onto the left as the shoe Stretcher can be used for the Right-side shoe or the Left-side shoe.
If you have bought two shoe stretchers you can use them as shoe trees to keep the shape of your shoes.


